Arcade Vehicle Driver - User Manual
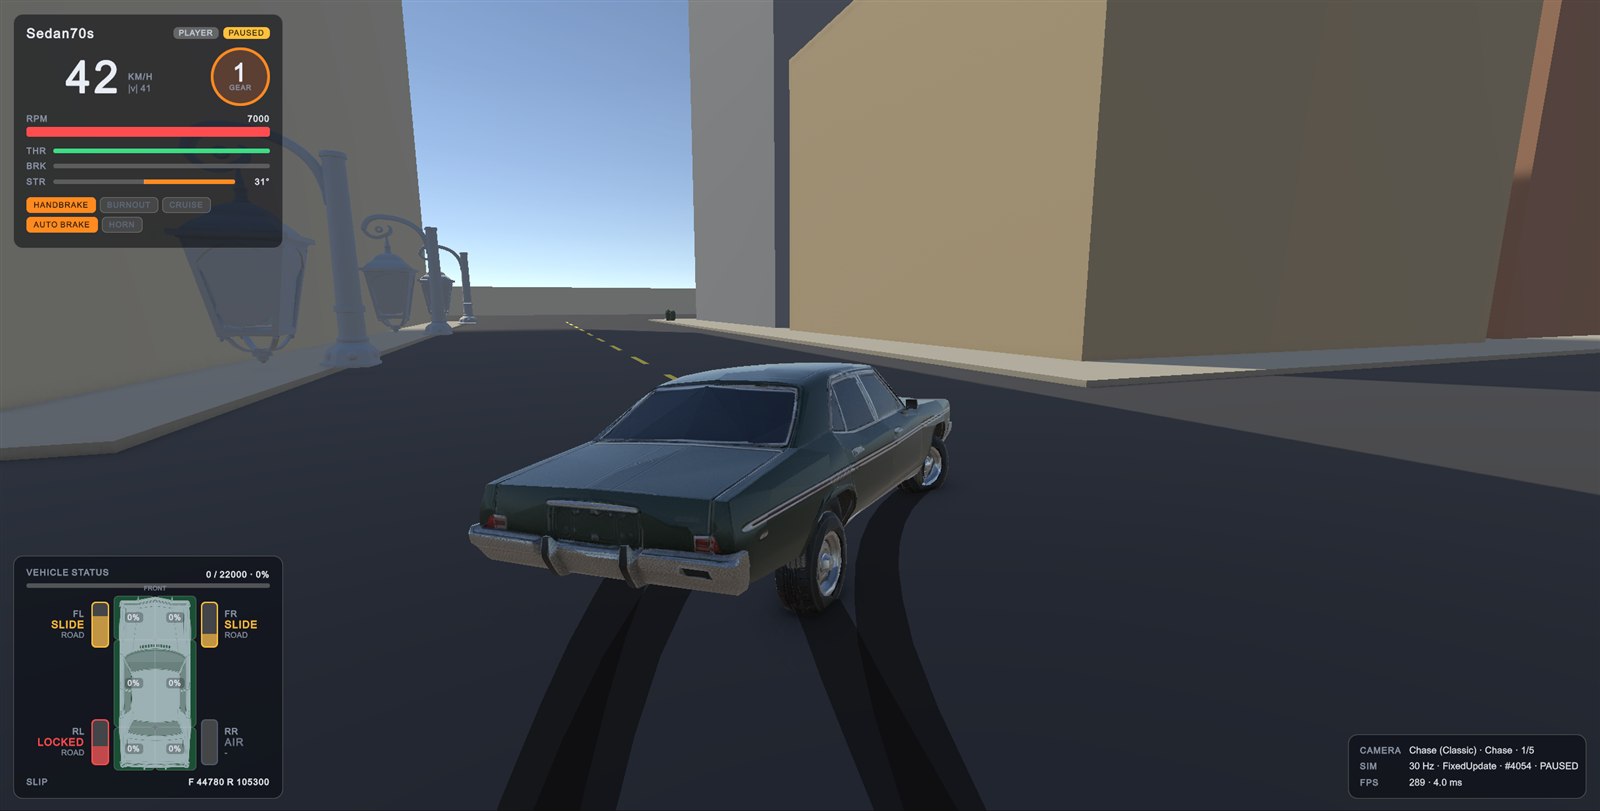
Arcade Vehicle Driver is a complete arcade car-handling kit for Unity, based on the gameplay mechanics of Driver 2. It gives you cars that slide, burn out, jump and crash with the weight and feel of a classic 3D arcade driving game, plus the effects, sound, camera and editor tools to put your own cars on the road in minutes.
This manual explains how the package works and how to use and configure it. Every setting of every component is listed, with its default and what it does, in the Settings Reference. The same descriptions appear in the inspectors: hover a setting, or turn on Field descriptions at the top of any package inspector.
Contents
- Features
- Requirements and installation
- Quick start
- The Playground sample
- How it works
- Setting up a vehicle
- Tuning the handling
- Engine, ignition and horn
- Gearbox and transmissions
- Drivetrain and traction
- Launches and burnouts
- Damage
- The world: ground, surfaces and scenery
- Vehicle effects
- Impact effects
- Vehicle audio
- Camera
- Input, controls and the Vehicle Manager
- Debug HUD
- Scripting and AI
- Editor menu
- Inspectors
- Performance and determinism
- Troubleshooting
- Folders and assemblies
- Content notes
1. Features
- Fixed-tick simulation. Deterministic integer (fixed-point) physics at 30 ticks per second by default, independent of the frame rate; rendering is interpolated between ticks, so it is smooth at any FPS. Cars do not use Unity rigid bodies.
- Handling. Suspension, tyre grip, handbrake slides, burnouts, jumps, steering "auto brake" turn-in, speed and reverse limiters, cruise control, rear / front / all-wheel drive, optional traction limit.
- Engine and gearbox. Optional ignition with cranking and damage-dependent start failures, horn, automatic / manual / manual-with-clutch transmissions, configurable gears, RPM range and rev limiter, brake-stand burnouts and launches.
- Collisions and damage. Car-to-car (3D) and car-to-scenery collisions, six damage zones, wreck limit, per-vehicle resistance; visual damage with dents, damaged materials, detachable parts and breaking glass.
- Effects. Engine smoke and fire by damage, exhaust, hit debris, tyre marks, smoke and dust per ground type, impact sparks and sounds per material.
- Audio. Classic two-loop engine or layered N-loop engine, ignition, tyre squeal with adjustable sensitivity, gear shifts, bumps, horn, wind, damaged engine. Unity AudioSources or an optional FMOD output.
- Camera. Chase, bumper, mounted (hood, cockpit) and tripod modes with blends, orbit, shake, obstacle avoidance and per-vehicle camera seats; preview in edit mode.
- Tools. Vehicle Setup Wizard, wheel detection, Fit Physics To Model, Scene view handles for the body shape, definition preview stage, sectioned inspectors with built-in help, debug HUD.
- AI-ready. Anything implementing one interface can drive a car through the same code path as the player.
2. Requirements and installation
| Item | Requirement |
|---|---|
| Unity | Unity 6 (developed and tested on 6000.6) |
| Render pipeline | Universal Render Pipeline (the effect and sample materials use URP shaders) |
| Packages | Input System (1.x) - required. ProBuilder (5.x or newer) - only for the Playground sample scene and its builder |
| Optional | FMOD for Unity 2.02+ for the FMOD audio output |
- Import the package. Everything lives in one folder (
Assets/ArcadeVehicleDriverby default; you can move it). - If the project does not use the Input System yet, Unity asks to enable the new input backend: accept and let the editor restart (Project Settings > Player > Active Input Handling = Input System Package or Both).
- Run Tools > Arcade Vehicle Driver > Setup Project. It creates the three layers the package uses (
AVDGround,AVDScenery,AVDVehicle) and the default assets inDefaults/(bindings, camera profile, impact materials, effects, placeholder sounds). It is safe to run again.
3. Quick start
From an empty scene to driving your own car:
Tools > Arcade Vehicle Driver > Setup Project (once per project).
Mark the world. Select your roads / terrain and run Tools > Arcade Vehicle Driver > World > Mark Selection As Ground. Select buildings, walls and poles and run Mark Selection As Scenery (Solid) (or Barrier for long walls and railings, Smashable for props that cars knock away).
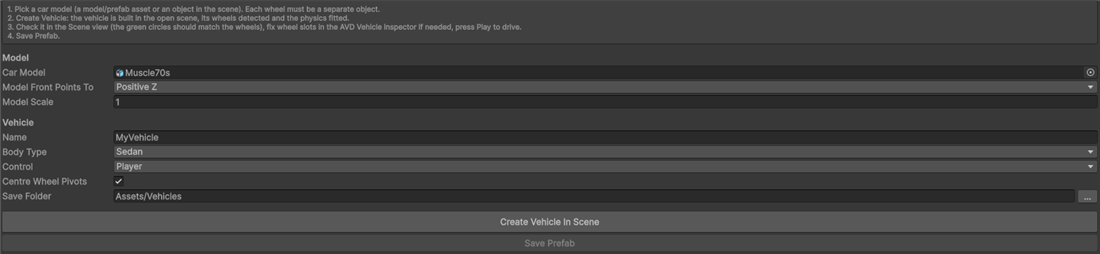
Create the car. Open Tools > Arcade Vehicle Driver > Vehicle Setup Wizard..., drop your car model in (each wheel must be a separate object), set Model Front Points To and Model Scale, pick a Body Type, press Create Vehicle In Scene, check the result and press Save Prefab.
Set up the scene. Tools > Arcade Vehicle Driver > Setup Scene adds the systems object (physics world, effects, HUD, vehicle manager) and the camera rig on the Main Camera.
Press Play and click the Game view so it receives the keyboard. W / S accelerate and brake, A / D steer, Space is the handbrake, E a burnout. F1 shows the debug HUD, F2 the controls.
4. The Playground sample
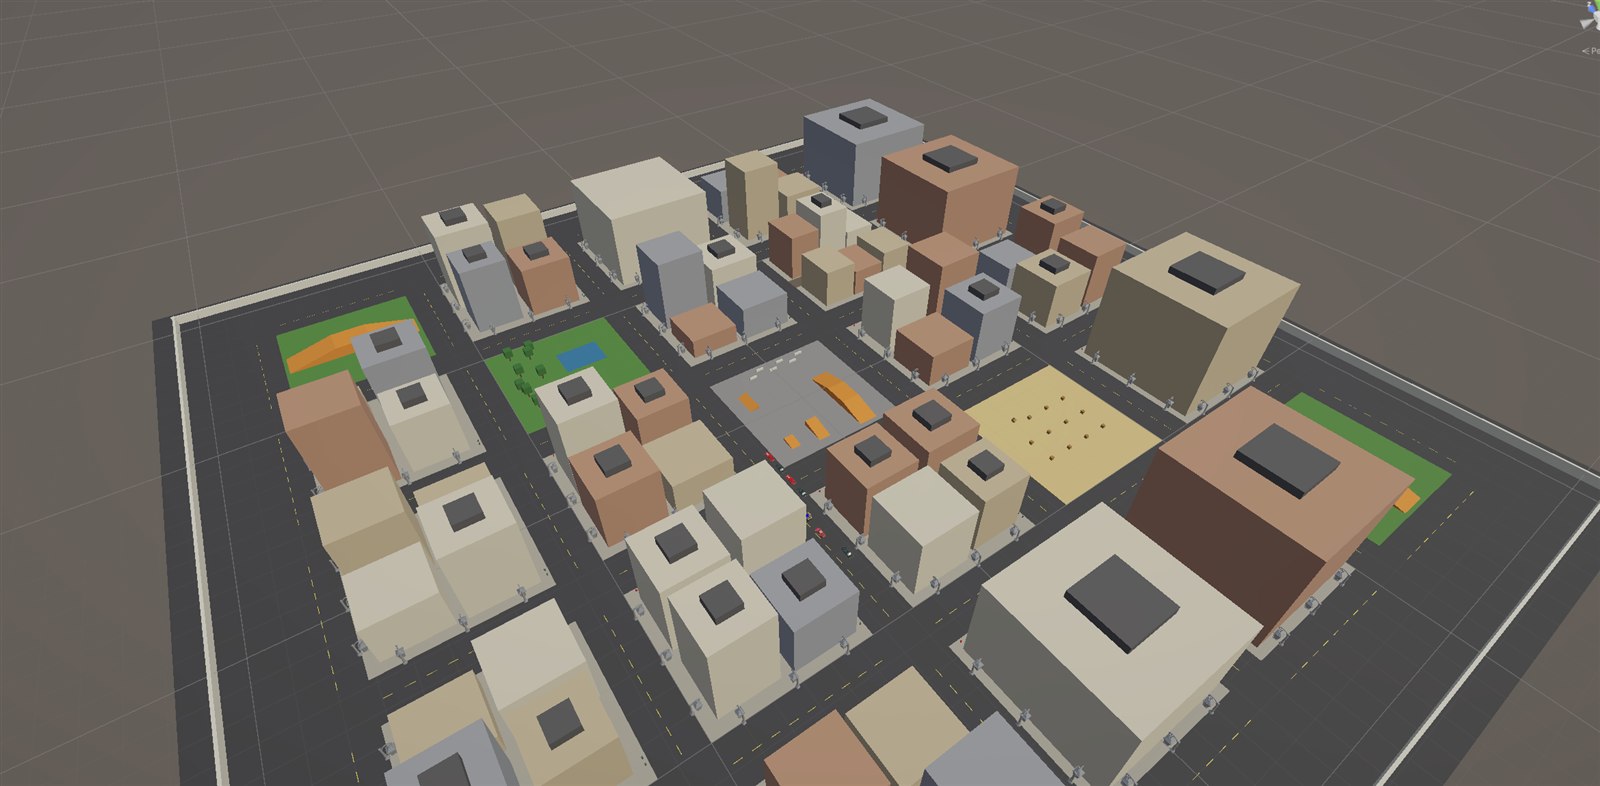
Samples/Playground/Scenes/Playground.unity is a small test city: city blocks and alleys, a park, a sand lot with smashable crates, a stunt plaza with ramps, a table-top and barriers, and hills, with several sample cars. Tab switches between the drivable cars, V cycles the camera modes. The scene needs ProBuilder (its geometry is ProBuilder meshes); *Tools > Arcade Vehicle Driver
Samples > Build Playground Scene* rebuilds it from code.
5. How it works
The simulation runs in fixed ticks (AVD Physics World > Tick Rate, 30 by default). Each tick reads every car's controls, computes the suspension, tyre and body forces, resolves collisions and moves the cars. All of it is integer math, so a given input sequence always gives the same result. The transforms you see are interpolated between the last two ticks. Because the physics constants are per tick, the tick rate is the game speed: keep 30 unless you want everything faster or slower.
Units. Inside the simulation 160 units = 1 metre (Units Per Meter), ratios use 4096 = 1.0 and angles use 4096 = 360 degrees. Inspectors show metres where it helps; the Settings Reference gives typical values.
Classic defaults. Every default reproduces the reference handling ("classic"); optional features (ignition, manual gearbox, traction limit, brake-stand burnouts...) start switched off.
The parts:
| Part | What it is |
|---|---|
| AVD Physics World | One per scene (created automatically if missing). Runs the ticks, queries ground and scenery, raises collision events. |
| AVD Vehicle | On the vehicle root. Its transform is the physics origin (centre of rotation); the model is a child facing +Z. |
| Vehicle Definition | Asset shared by every car of a model: geometry, handling, tuning, gearbox, drivetrain, damage, effects. |
| AVD Player Input / any controller | Feeds the car one tick of controls. AI uses the same entry point. |
| AVD Vehicle Manager | Which cars the player drives (Tab switches) and the player's transmission. |
| AVD Chase Camera | The camera rig, driven by a Camera Profile asset. |
| Effects, Audio, Damage, HUD | Presentation only: they read the simulation and never change it. |
Layers. Ground = colliders on AVDGround (roads, terrain, ramps). Scenery = colliders on AVDScenery (buildings, walls, poles, props). Vehicles live on AVDVehicle. You can rename them in AVD Physics World > World queries.
Moving a car. Never move a vehicle's transform directly: call Teleport(position, yaw) or ResetUpright().
6. Setting up a vehicle
6.1 The model
A vehicle is a root object with AVD Vehicle (and AVD Player Input for the player) and the model as children. Requirements for the model:
- It faces +Z with +Y up (the wizard can rotate it for you).
- Each wheel is a separate object (vehicles with more than four wheels drive on the outer four; extra wheels are visual only).
- For visual damage its meshes must be readable (the damage inspector can switch Read/Write on).
6.2 Vehicle Setup Wizard
The wizard turns a model into a working vehicle: orientation, wheel detection (by name: wheel, tire, tyre, rim... and by position), centred wheel pivots, a new definition fitted to the model from a body type template (Sedan, Coupe, Long Sedan, Muscle, Van, Sports), player input and a prefab. The body type supplies the engine power, grip, inertia and contact-point layout; the dimensions come from your model.
6.3 The AVD Vehicle inspector
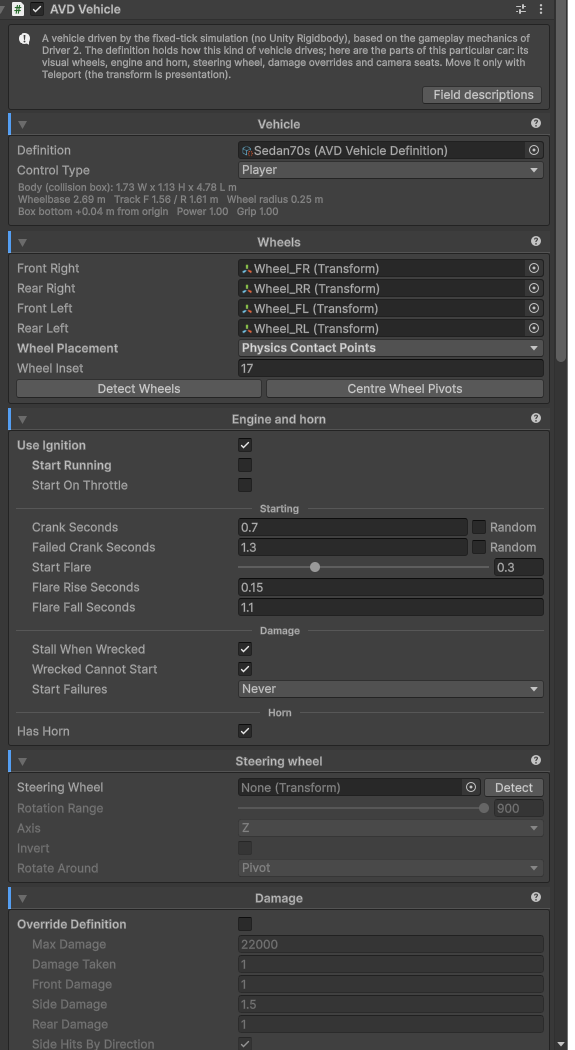
- Vehicle: the definition and the control type (Player = precise handling with wheel lock under hard braking, AI = the cheaper path for traffic, None = not simulated).
- Wheels: the four slots in the order Front Right, Rear Right, Front Left, Rear Left. Detect Wheels fills them; Centre Wheel Pivots wraps off-centre wheels in a centred parent so they spin cleanly. Wheel Placement: Model Position keeps each wheel where the model has it and only moves it with the suspension; Physics Contact Points draws the wheels at the definition's contact points.
- Engine and horn: optional ignition (see section 8).
- Steering wheel: optional; turned with the front wheels (Rotation Range lock to lock, axis, pivot).
- Damage: the definition's damage settings or this car's own override, and the damage it starts with.
- Camera positions: this car's seats for Mounted camera modes (cockpit, hood...), matched by mode name. Edit shows handles in the Scene view, Align To Scene View copies the Scene camera, Preview shows it.
- Scene view helpers: which gizmos to draw and the legend.
- Fit physics to model: measures the wheels and body and writes the wheel contact points, wheel size, collision box and body contact points into the definition (Undo restores everything).
6.4 Scene view helpers and body shape
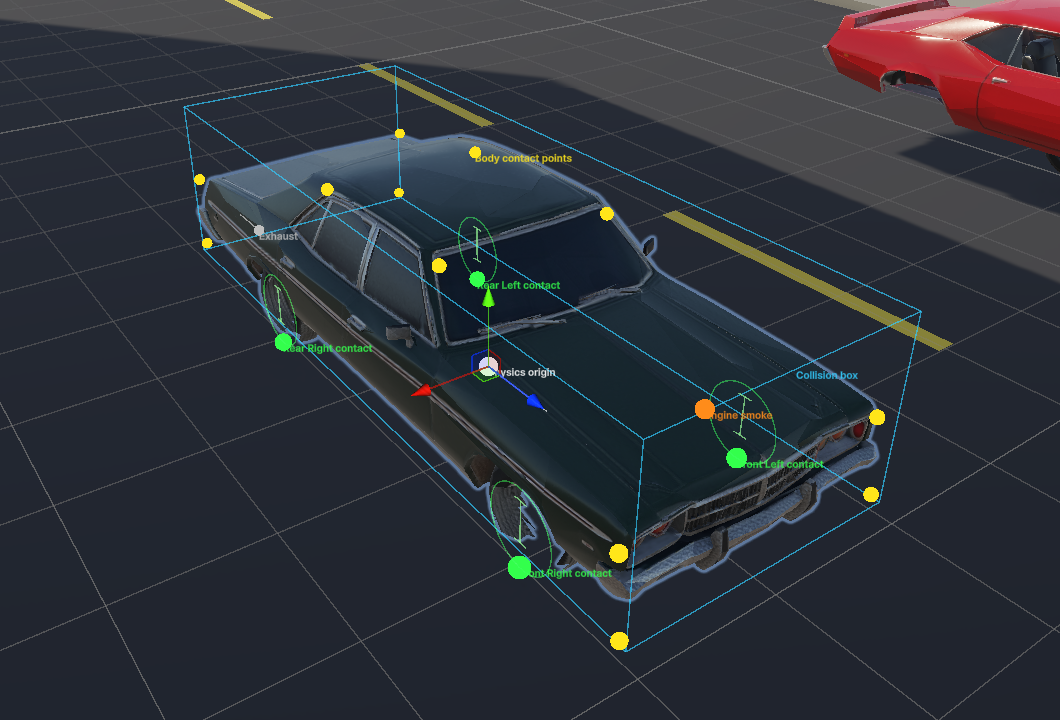
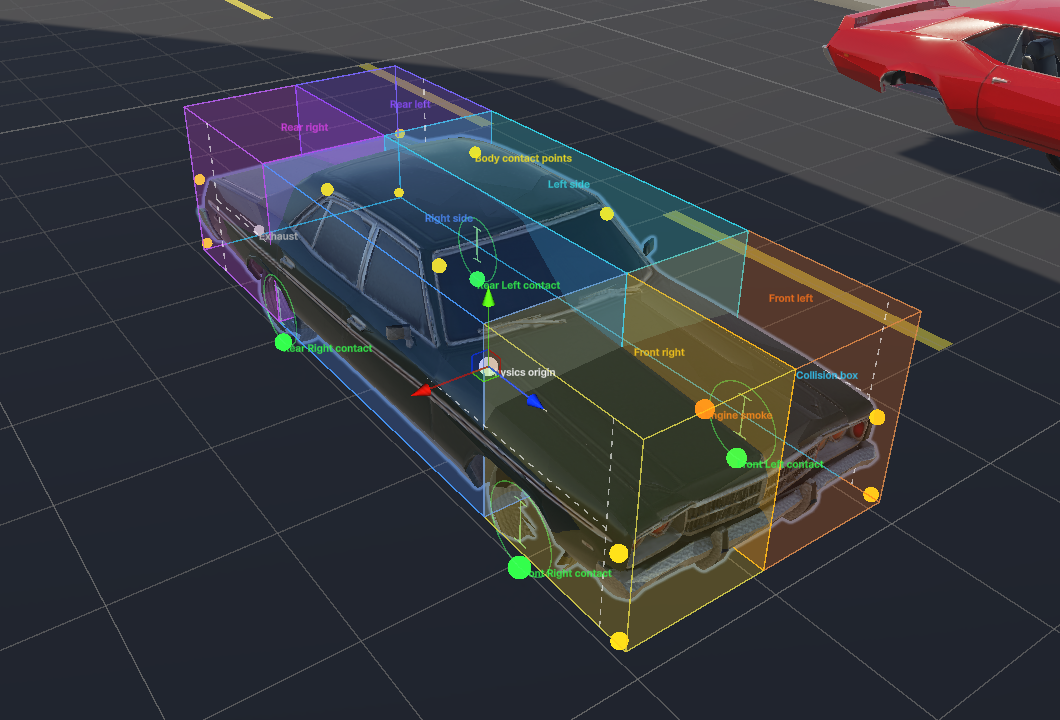
With the vehicle selected: white = physics origin and forward, cyan = collision box, yellow = the 12 body contact points (they keep the chassis out of the ground and lift it onto steps), green = wheel contact points and wheel circles (compare them with the model's wheels), light green = suspension travel, orange / grey = engine and exhaust effect points. Damage Zones (off by default) draws the six damage zones.
Edit Body Shape In Scene (vehicle or definition inspector) makes the collision box faces and the body points draggable. Mirror Left / Right keeps both sides symmetric and Points Follow Box scales the points with the box. Edits go into the definition, support Undo and apply live in Play mode.
Definition preview. In the definition inspector, Open Preview In Scene View opens an isolated stage (like Prefab Mode) with a preview model, all the helpers and the handles, while the definition stays in the inspector.
7. Tuning the handling
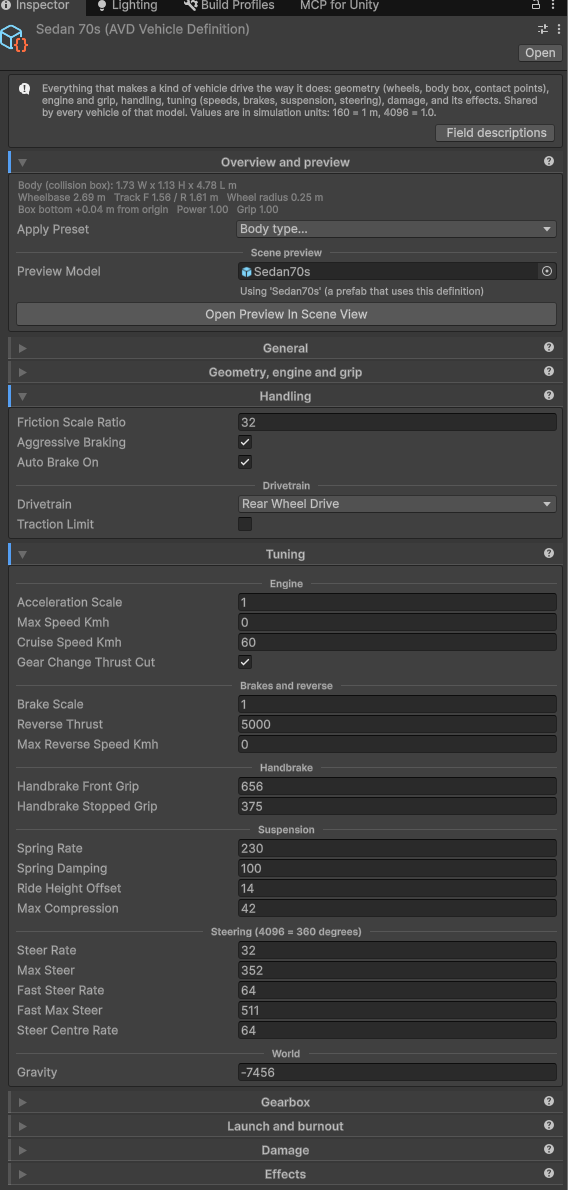
The Vehicle Definition holds how a kind of vehicle drives. Its sections:
| Section | Contents |
|---|---|
| Overview and preview | Size summary in metres, Apply Preset (body type), Scene preview. |
| Geometry, engine and grip | Wheel contact points and size, Power Ratio, Traction, collision box, centre of gravity, body points, inertia, mass. |
| Handling | Overall grip (Friction Scale Ratio), aggressive braking, steering auto brake, drivetrain, traction limit. |
| Tuning | Acceleration scale, top speed and cruise speed, brakes, reverse, handbrake grip, suspension, steering, gravity. |
| Gearbox | RPM range, rev limiter, number of gears, shift points. |
| Launch and burnout | Optional brake-stand burnouts and launches. |
| Damage | Wreck limit and damage multipliers. |
| Effects | Impact material, effects profile and effect points. |
Tuning and handling edits apply live in Play mode; geometry edits need the vehicle's Reload Cosmetics (context menu) or a Play mode restart.
Recipes:
| Goal | Change |
|---|---|
| Faster acceleration and top speed | Power Ratio up (4096 = normal car, 4700 = muscle car) or Acceleration Scale up |
| Hard top speed | Max Speed Kmh (0 = only drag limits it, about 130 km/h for a normal car) |
| More grip, less sliding | Traction up (4096-4400), or Friction Scale Ratio up (32 = normal, 45-68 = trucks / 4x4) |
| Drift car | Traction a little down, Handbrake Front Grip up, Auto Brake On on |
| Stable, understeering car | Auto Brake On off, Twist Rate Y down |
| Heavy truck or van | Power Ratio 3000, Mass up, Twist Rate Y / Z down (180 / 900), Gravity more negative |
| Stiffer suspension | Spring Rate up, Spring Damping up |
| Shorter braking | Brake Scale up, Aggressive Braking on |
| Quicker steering | Steer Rate up (keyboard / d-pad), Max Steer up (angle) |
| Tougher car | Max Damage up or Damage Taken down (Damage section) |
8. Engine, ignition and horn
AVD Vehicle > Engine and horn. With Use Ignition off (the default) the engine always runs. With it on:
- The engine can be off (Start Running off = the car starts switched off). While off the car brakes and steers but cannot accelerate, reverse, burn out or cruise.
- Start it with the Ignition action (I), from scripts (
StartEngine(),StopEngine(),ToggleEngine()), or with Start On Throttle (accelerating turns the key, handy for AI). - The starter turns for Crank Seconds (a fixed time, or tick Random for a different time between Min and Max on every start), the engine catches and the revs flare (Start Flare) and settle to idle.
- Start Failures: Above Damage (from X% damage starting may take up to N attempts) or Damage Levels (a list, for example 20% = up to 3, 60% = up to 5, 90% = up to 8 attempts). A wrecked car stalls (Stall When Wrecked) and only cranks (Wrecked Cannot Start) until repaired.
- Engine smoke and exhaust stop while the engine is off; a wreck's fire keeps burning.
Horn: Has Horn; the Horn action (H), SetHorn(bool) to hold it or Honk(seconds) from scripts. The HornChanged event lets other systems react (pedestrians, for example).
9. Gearbox and transmissions
Definition > Gearbox:
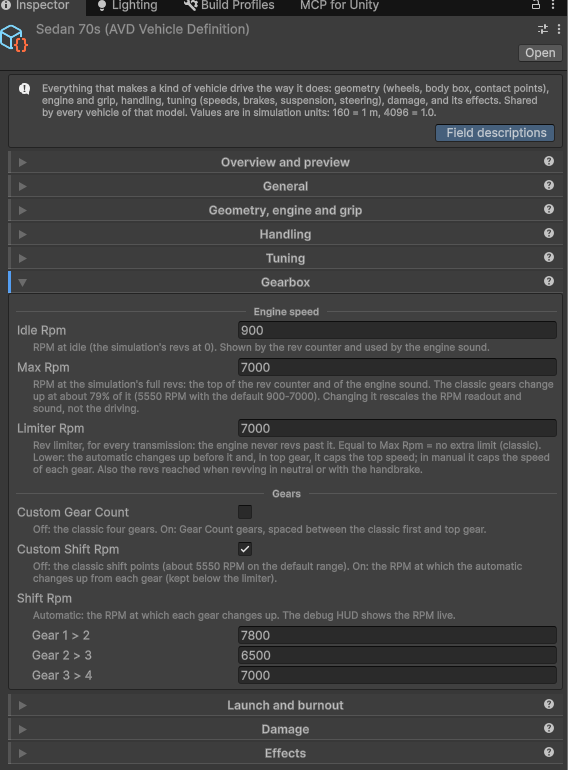
- Idle Rpm / Max Rpm: the car's RPM range. The rev counter, the engine sound and every RPM setting use it. Changing it rescales the readout and the sound, not the driving.
- Limiter Rpm: the rev limiter for every transmission. Equal to Max Rpm = no extra limit (classic). Lower: the automatic changes up before it and top gear tops out there; in manual every gear tops out there.
- Custom Gear Count (1-8) and Custom Shift Rpm (where the automatic changes up, one value per gear change).
The classic gears shape the revs and sound; the thrust itself does not depend on the gear in the automatic.
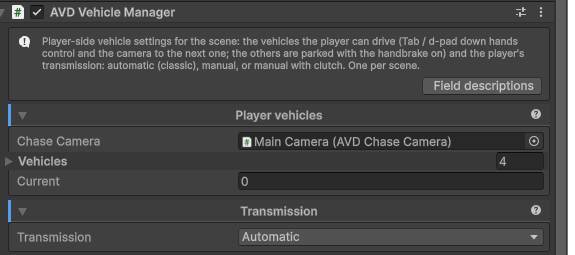
AVD Vehicle Manager > Transmission sets how the player changes gear (AI always uses the automatic):
| Mode | How it drives |
|---|---|
| Automatic | Classic. The gear follows the speed; holding brake when stopped reverses. |
| Manual | Gear Up (X) / Gear Down (Z) through R, N, 1, 2... The brake only brakes (and holds the car at walking pace); reverse is the R gear (selectable below 5 km/h). Each gear tops out at the limiter; a gear too high for the speed pulls weakly. |
| Manual With Clutch | As Manual, but changing gear needs the Clutch (Left Ctrl) held, and the engine is disconnected while it is held. |
In neutral, with the clutch held, with accelerate + brake in manual, or with the handbrake pulled, the throttle only revs the engine (up to the limiter), and it sounds like it.
10. Drivetrain and traction
Definition > Handling > Drivetrain: Rear Wheel Drive (classic), Front Wheel Drive or All Wheel Drive. The total push is the same for every layout (four-wheel drive does not add power); all-wheel drive splits it between the axles (Front Drive Share, 0.4 = 40% front) and, with Adaptive Split, moves it towards the axle with more grip: the loaded one on a climb or under acceleration, the one on asphalt when the other is on grass, sand or water.
Traction Limit (off = classic): each driven wheel can only push as hard as the weight on it allows (Traction Grip). Under acceleration or on a climb the front axle unloads, so a front-wheel-drive car spins its tyres and pulls less, rear drive gains grip and all-wheel drive keeps pulling. Grass and sand already halve the grip.
11. Launches and burnouts
- Burnout button (E / Circle): the driven wheels spin and the car launches, until it grips.
- Brake-stand burnout (Definition > Launch and burnout > Brake Stand Burnout, off by default): accelerate against the brakes from a standstill (manual: first gear + handbrake; automatic: accelerate + brake). The revs climb from idle over Build Up Seconds, the driven wheels wind up and break loose (smoke, squeal) and the brakes hold the other axle. Cars well above Min Power creep forward (Creep); weaker ones (vans) only rev, and so do all-wheel-drive cars. Releasing the brakes with the throttle held launches the car with a burnout; release the throttle first to pull away calmly.
12. Damage
12.1 Damage in the simulation
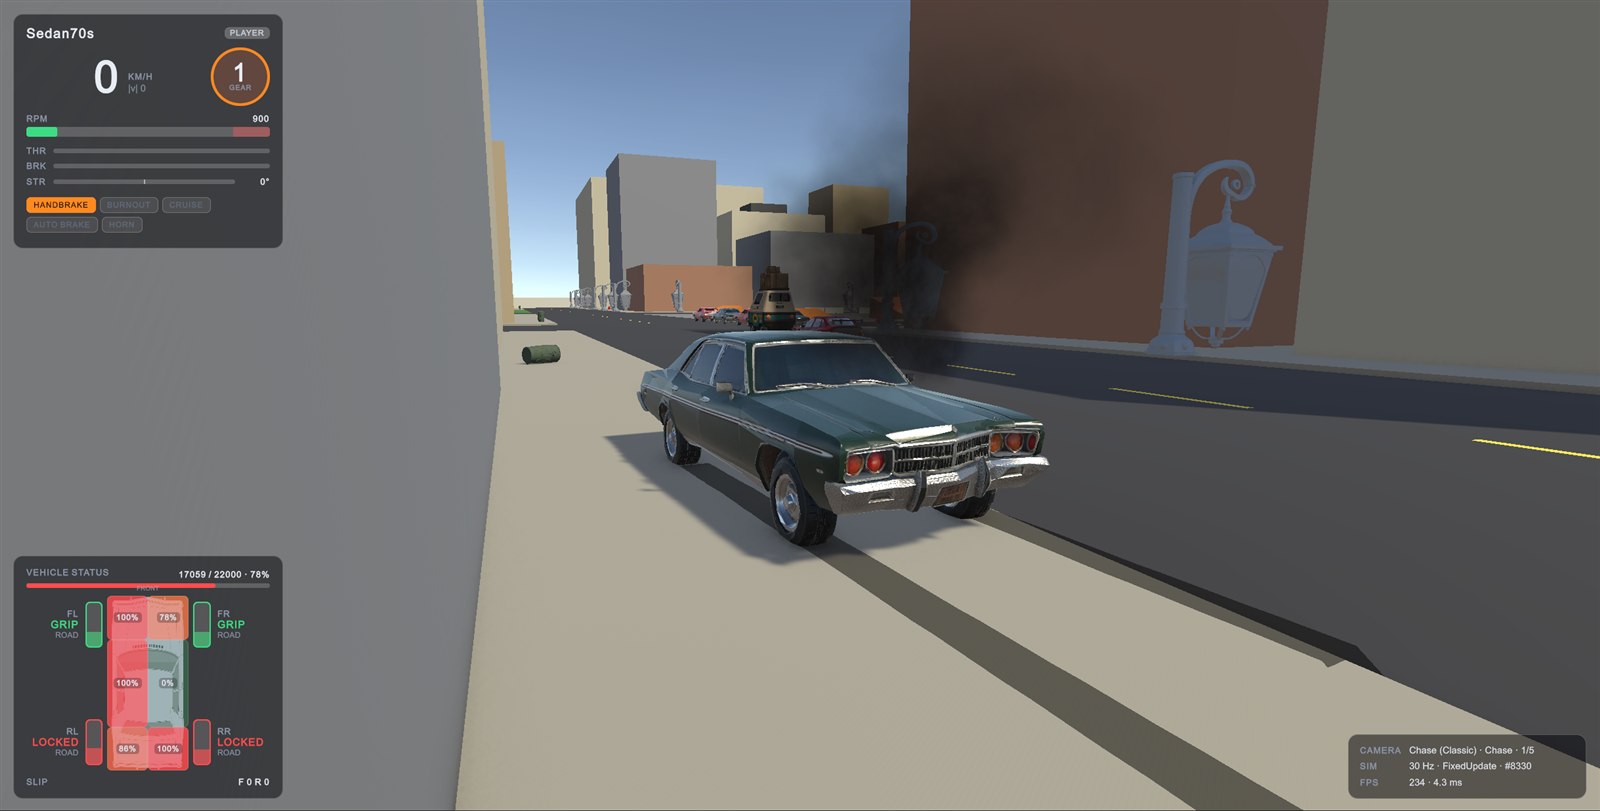
Every car has six damage zones (front left, front right, right side, rear right, rear left, left side) and a total. Hits add damage to the zone they land on; the car is wrecked when the total reaches Max Damage (22000 by default): black smoke and fire, the engine stalls (with the ignition) and, with Wrecked Stops Car, it locks up.
Definition > Damage (or a per-vehicle override): Max Damage, Damage Taken (0.5 = armoured, 2 = fragile, 0 = indestructible), Front / Side / Rear Damage multipliers and Side Hits By Direction. Start Damage on the vehicle sets the damage it spawns with. In Play mode the vehicle inspector shows the damage with a slider and Repair.
12.2 Visual damage
Add AVD Vehicle Damage to the vehicle to show the damage on the model. Each feature can be switched on or off; handling is never affected.
- Dents: Zones (each zone crushes its part of the body), Impact Point (each hit dents where it struck, in the direction of the blow) or Hybrid. The dent shape is generated, so it works with any model.
- Damaged material: a scratch / dirt overlay drawn over the damaged areas.
- Detachable parts: found by name (hood, bumper, door, spoiler, mirror...) or listed by hand; they fly off with Unity physics.
- Glass: windows crack and then break with shards.
In Play mode the inspector has test hits per zone; scripts can call ApplyHit(worldPoint, damage).
13. The world: ground, surfaces and scenery
- Ground = colliders on
AVDGround, found with downward rays. Ground must not have vertical faces: the body points lift a car onto any step up to Probe Up (2.5 m). Put a scenery box under ramps and platforms so their sides act as walls. - Surface types: Road, Grass (bumpy, half grip), Water / Deep Water (strong drag), Sand, Alley. The type of a collider comes from an AVD Surface component on it, else its PhysicsMaterial mapped in *AVD Physics World
Surfaces By Physics Material* (World > Set Surface Of Selection assigns them), else Road.
- Scenery = colliders on
AVDScenery, used as upright boxes. AVD Scenery Object adds flags: Barrier (cars slide along it), Smashable (cars drive through and knock it away; respawn time, mass, fling) and an impact material. - AVD Physics World: tick rate, units per metre, rain wetness (less grip), ground probe range and the clock (its own fixed-tick loop or Unity's FixedUpdate, with identical results).
14. Vehicle effects
AVD Vehicle Effects (on the systems object) runs the effects of every car, paced by the simulation ticks:
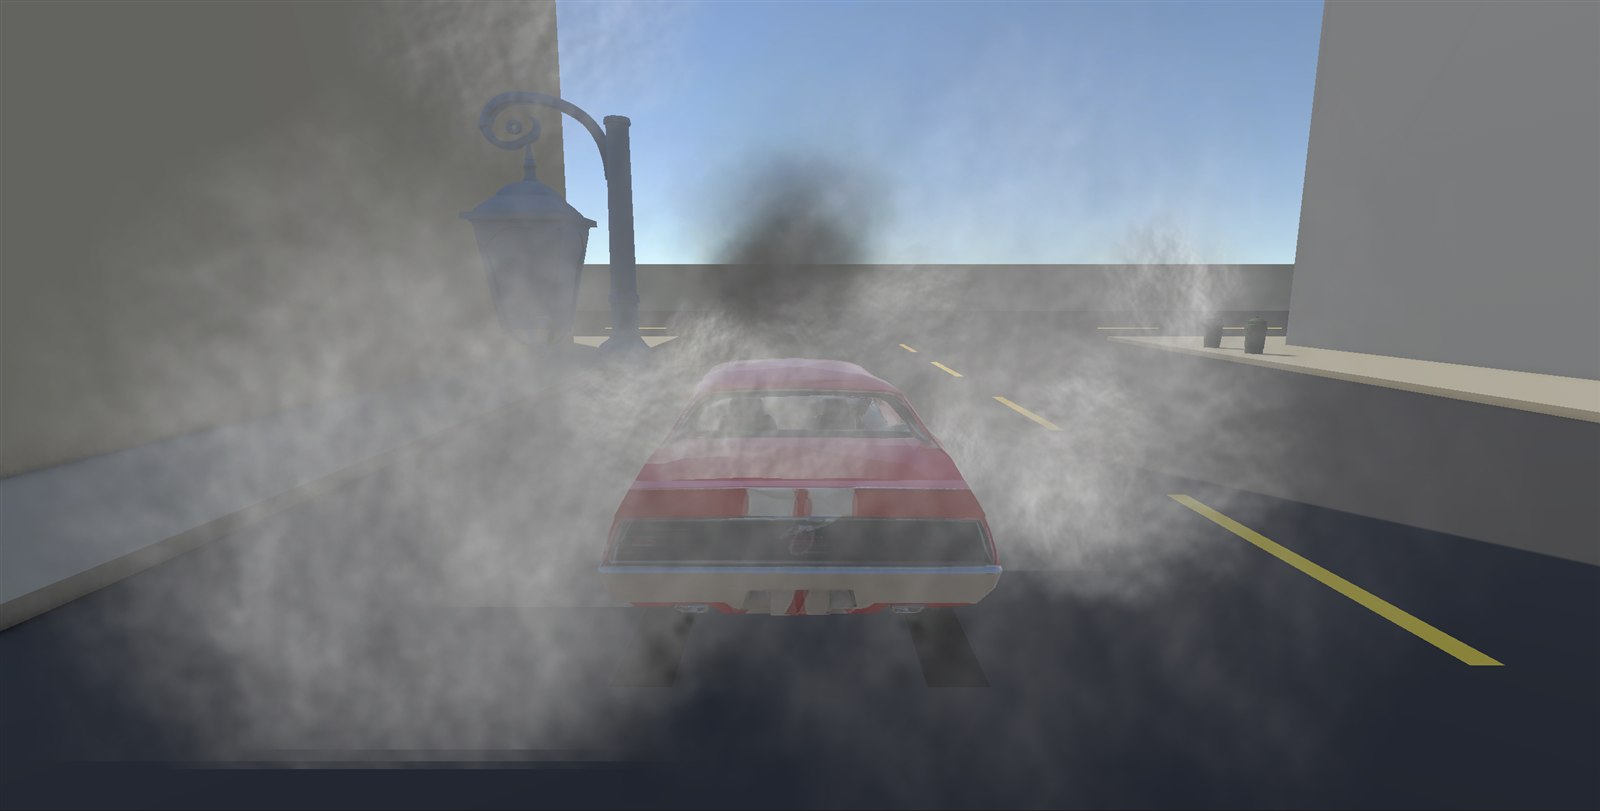
- Engine smoke by damage: white from front damage 2000, black from 3000, fire when wrecked; fades with speed.
- Exhaust puffs when nearly stopped (black when badly damaged).
- Hit debris on car and scenery hits.
- Tyres: when an axle slides past the skid threshold or the driven wheels spin, each wheel lays tyre marks and puffs smoke or dust.
The vehicle side is an AVD Vehicle Effects Profile (definition > Effects, else the component's default). Every particle slot takes your own ParticleSystem prefab or generated particles. The emitters are the definition's Effect Points (engine and exhaust pipes), automatic or dragged in the Scene view.
The ground side is an AVD Surface Effects asset per kind of ground: mark colour, width and material, skid smoke, debris, tyre sounds. A wheel picks its surface from, first match: AVD Surface > Surface Effects on the object, the ground's render material, the most painted terrain layer, the collider's PhysicsMaterial, the surface type, the default.
15. Impact effects
AVD Impact Effects plays particles and sounds for every collision: car hits, scenery hits, landings and smashed props. Each impact picks an AVD Impact Material (minimum and full-strength speed in km/h, particles, count, random sounds): the vehicle's or scenery object's own, a mapping by surface or PhysicsMaterial, or the default for its kind (Sparks, Dust, Dirt, Wood Chips are included).
16. Vehicle audio
Add AVD Vehicle Audio to a vehicle and give it a Vehicle Sound Profile (one per kind of vehicle). Tools > Arcade Vehicle Driver > Audio > Generate Placeholder Sounds creates placeholder clips and two profiles (Classic and Layered); replace the clips with recordings.
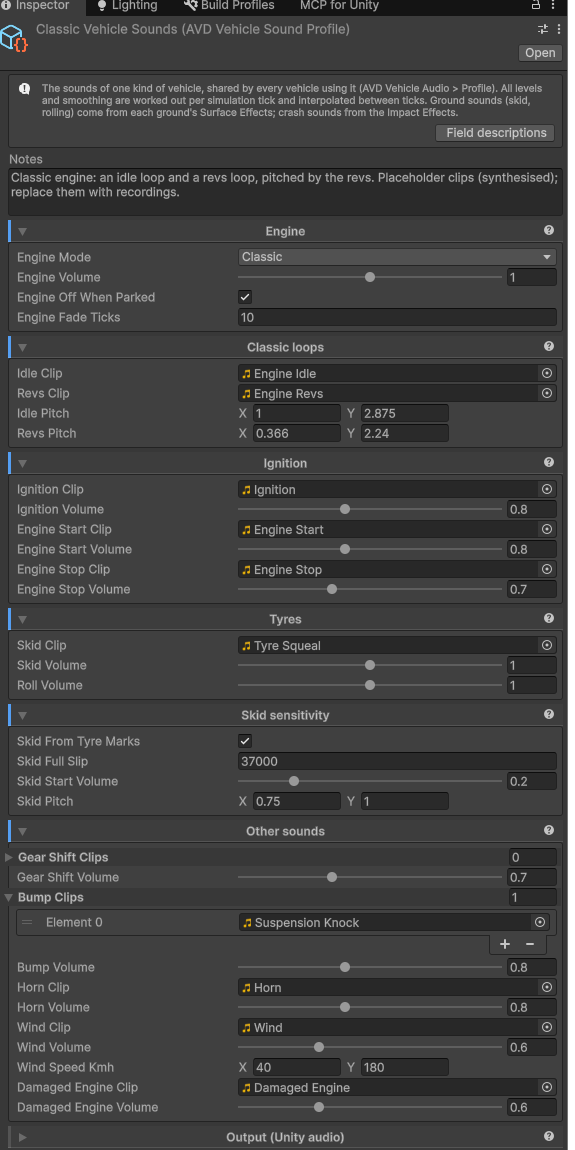
- Engine, Classic: an idle loop and a revs loop, pitched by the revs and cross-faded by the throttle.
- Engine, Layered: any number of loops recorded at fixed RPMs (plus optional off-throttle loops), cross-faded by RPM and load, like modern racing games.
- Ignition loop, engine start and stop.
- Tyres: squeal by slip with Skid sensitivity (start, full, start volume; by default it starts exactly where the tyres start leaving marks) and rolling noise by speed, both per ground type.
- Other: gear shifts, suspension knocks, horn, wind, damaged engine.
All smoothing runs per simulation tick. The output is Unity AudioSources (mixer groups, 3D settings in the profile). FMOD: import FMOD for Unity, run Tools > Arcade Vehicle Driver > Audio > FMOD Integration > Enable, add AVD FMOD Vehicle Audio Output next to AVD Vehicle Audio and assign your events; RPM, load, speed, skid, surface and more are sent as parameters. Any component implementing IAVDVehicleAudioOutput can replace the output (Wwise, a custom mixer).
17. Camera
AVD Chase Camera (on the Main Camera) uses a Camera Profile asset, edited inline in the camera inspector. Each mode has a type:
| Type | Use |
|---|---|
| Chase | The follow camera: framing from the car's size (Classic Framing), lag, cornering swing, speed FOV and distance. |
| Mounted | Bumper, hood or cockpit views, with per-vehicle seats (AVD Vehicle > Camera positions). |
| Tripod | A TV camera beside the road that the car drives past. |
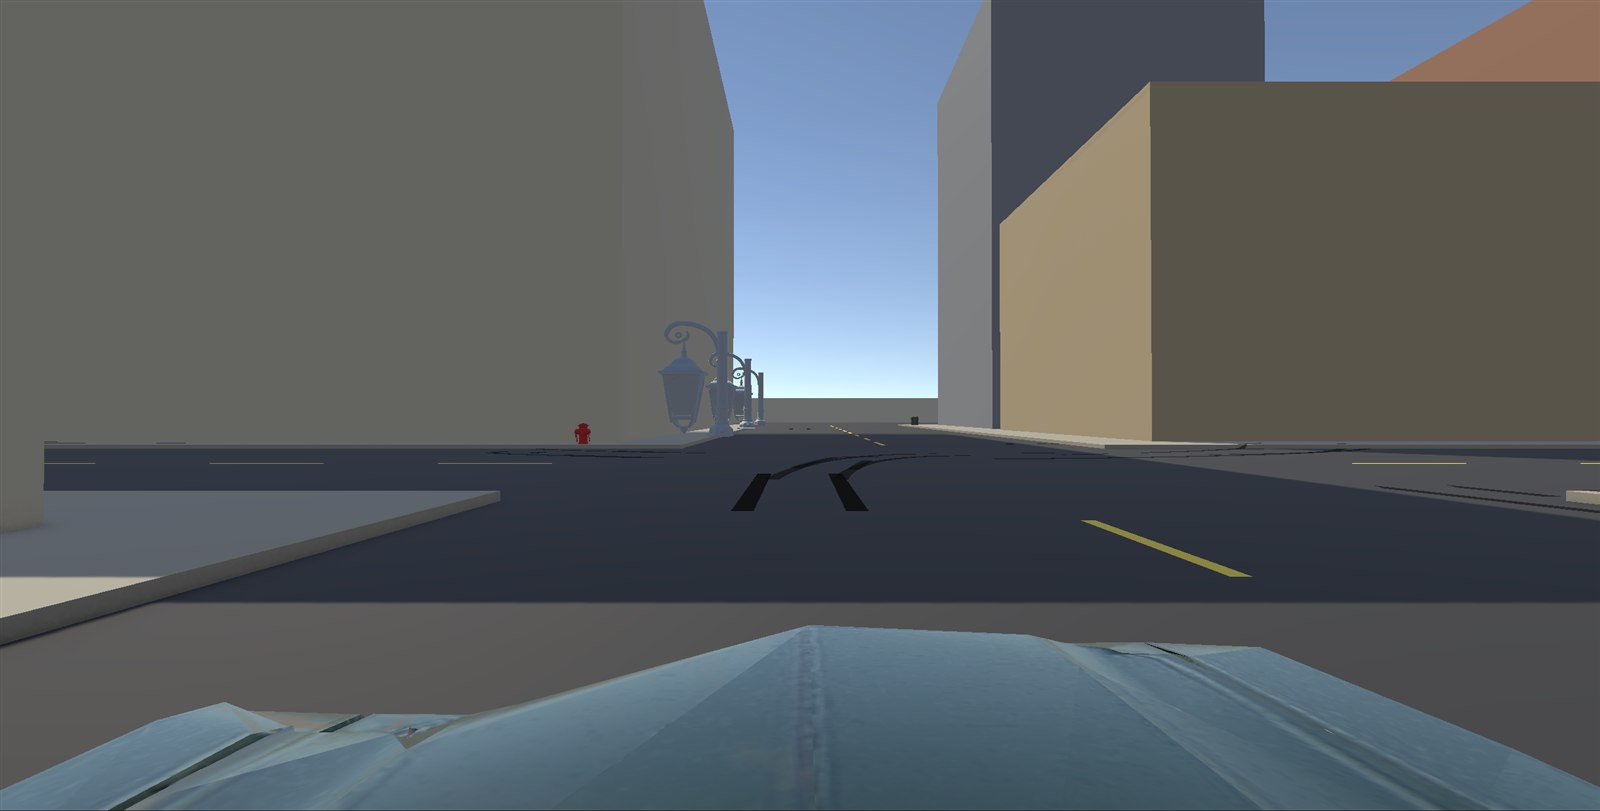
Every mode can add manual orbit (right mouse button / right stick), obstacle avoidance and shake (impacts, landings, speed). V / Start cycles the modes, Q / R3 looks back. With the game stopped the Game view previews the selected mode (Edit Mode Preview simulates speed and steering). Add Example Modes adds a dynamic chase, a far chase, a hood view and a tripod.
18. Input, controls and the Vehicle Manager
| Action | Keyboard | Gamepad |
|---|---|---|
| Accelerate | W / Up | Cross (A), RT (analog) |
| Brake / reverse | S / Down | Square (X), LT |
| Steer | A D / arrows | left stick, d-pad |
| Fast steer | Left Shift | L1 |
| Handbrake | Space | Triangle (Y), R1 |
| Burnout | E | Circle (B) |
| Cruise control | C | d-pad up |
| Horn | H | L3 |
| Engine on / off (with ignition) | I | (bind in the asset) |
| Gear up / down (manual) | X / Z | (bind in the asset) |
| Clutch (manual with clutch) | Left Ctrl | (bind in the asset) |
| Reset car | R | Select |
| Look back | Q | R3 |
| Next car | Tab | d-pad down |
| Next camera mode | V | Start |
| Rotate camera | right mouse button + mouse | right stick |
| HUD / help / pause / step one tick | F1 / F2 / P / . |
The bindings are Defaults/AVDVehicleControls.inputactions (maps Vehicle and Camera); edit them in the Input Actions editor. It also has unbound GearReverse, GearNeutral and Gear1..Gear8 actions for an H-pattern shifter or number keys. AVD Player Input works on its own copy of the bindings per car and has the stick deadzone, analog throttle and rumble settings.
AVD Vehicle Manager (one per scene, added by Setup Scene): the list of drivable vehicles, the camera that follows the active one, the vehicle at start, and the player's Transmission. Only the active vehicle's input is enabled; the others are parked with the handbrake on.
19. Debug HUD
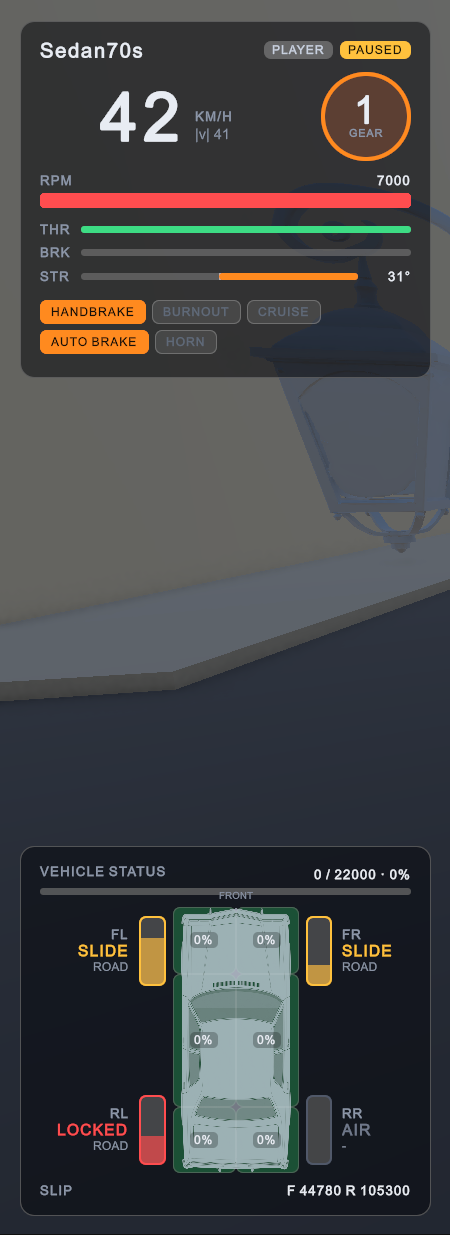
AVD Debug HUD (on the systems object): F1 shows or hides it, F2 the controls help, P pauses the simulation and . advances one tick. Modern (UI Toolkit): speed, gear, RPM bar with redline, throttle / brake / steering, chips (handbrake, burnout, cruise, auto brake, horn, engine), total damage, a top-down car with the six damage zones, the four tyres (suspension, GRIP / SLIDE / SPIN / LOCKED / AIR, ground type), camera mode, simulation clock and FPS. Classic is a compact text overlay. Switch with Hud Style or Tools > Arcade Vehicle Driver > Debug HUD. The modern layout (Runtime/Debug/Resources/AVDHud) can be edited in the UI Builder.
20. Scripting and AI
All runtime types are in the ArcadeVehicleDriver namespace (simulation types in ArcadeVehicleDriver.Simulation).
Driving a car from code (AI)
Implement IAVDVehicleController on a component of the vehicle. Each simulation tick the vehicle asks it for one tick of controls, through the same path the player uses:
using ArcadeVehicleDriver;
using ArcadeVehicleDriver.Simulation;
using UnityEngine;

[RequireComponent(typeof(AVDVehicle))]
public class FollowTargetDriver : MonoBehaviour, IAVDVehicleController
{
    public Transform target;
    public float cruiseKmh = 50f;

    AVDVehicle m_Vehicle;

    void OnEnable()
    {
        m_Vehicle = GetComponent<AVDVehicle>();
        m_Vehicle.Controller = this; // take control (the player's input is no longer read)
    }

    public AVDCarControls GetControls(AVDVehicle vehicle)
    {
        var c = AVDCarControls.Neutral;
        if (target == null)
        {
            c.pad = AVDPad.Handbrake;
            return c;
        }

        // steer towards the target with the analog path (-128..127)
        Vector3 local = vehicle.transform.InverseTransformPoint(target.position);
        float angle = Mathf.Atan2(local.x, local.z) * Mathf.Rad2Deg;
        c.useAnalogue = true;
        c.analogSteer = Mathf.RoundToInt(Mathf.Clamp(angle / 30f, -1f, 1f) * 127f);
        if (c.analogSteer != 0)
            c.pad |= c.analogSteer > 0 ? AVDPad.Right : AVDPad.Left;

        // hold a speed
        if (vehicle.ForwardSpeedKmh < cruiseKmh)
            c.pad |= AVDPad.Accel;
        else if (vehicle.ForwardSpeedKmh > cruiseKmh + 10f)
            c.pad |= AVDPad.Brake;
        return c;
    }
}
AVDScriptedDriver plays a timed list of inputs (in ticks), useful for repeatable tests.
Common calls
vehicle.Teleport(new Vector3(0f, 1f, 0f), yawDegrees: 90f); // place the car (never move its transform)
vehicle.ResetUpright();                                     // put it back on its wheels
vehicle.SetCruise(true);                                    // cruise control at Tuning > Cruise Speed Kmh

float kmh = vehicle.ForwardSpeedKmh;                        // also SpeedKmh, Velocity, Gear, EngineRpm
vehicle.Damage += 2000;                                     // also MaxDamage, DamageFraction, IsWrecked
vehicle.Repair();

vehicle.StartEngine();                                      // with Use Ignition; also StopEngine, ToggleEngine
vehicle.Honk(0.5f);                                         // or SetHorn(true / false)

vehicle.Transmission = AVDTransmission.Manual;              // usually set by the Vehicle Manager
vehicle.ShiftUp();                                          // also ShiftDown, SelectGear(-1 = R, 0 = N, 1..)
Events
void OnEnable()
{
    AVDPhysicsWorld.GetOrCreate().Impact += OnImpact;  // every collision
    vehicle.EngineEvent += (v, e) => Debug.Log($"{v.name}: {e}"); // CrankStarted, Started, CrankFailed, Stopped, Stalled
    vehicle.GearChanged += (v, gear) => Debug.Log($"gear {gear}");
    vehicle.HornChanged += (v, on) => { /* scare pedestrians */ };
}

void OnImpact(AVDImpact hit)
{
    // hit.kind: VehicleHit, SceneryHit, Landing, Smash; hit.speedKmh, hit.point, hit.normal,
    // hit.vehicle / hit.otherVehicle / hit.scenery / hit.collider / hit.surface
    if (hit.kind == AVDImpactKind.VehicleHit && hit.speedKmh > 40f)
        Debug.Log($"{hit.vehicle.name} crashed into {hit.otherVehicle.name} at {hit.speedKmh:0} km/h");
}
AVDPhysicsWorld.Ticked is raised after every simulation tick (use it for logic that must follow the ticks). Visual damage: GetComponent<AVDVehicleDamage>().ApplyHit(worldPoint, damage) adds damage at a point (explosions, scripted crashes).
21. Editor menu
All tools are under Tools > Arcade Vehicle Driver:
| Item | What it does |
|---|---|
| Setup Project | Layers, default assets, Input System check. Safe to run again. |
| Setup Scene | Systems object (physics world, impact and vehicle effects, HUD, vehicle manager) and camera rig. Only adds what is missing. |
| Vehicle Setup Wizard... | Model to vehicle: orientation, wheels, pivots, fitted definition, input, prefab. |
| Camera > Setup Camera On Main Camera / Select Camera Profile | Camera rig only / jump to the profile asset. |
| World > Mark Selection As Ground / Scenery (Solid, Barrier, Smashable) | Layer, collider and flags for the selected objects. |
| World > Set Surface Of Selection > ... | Surface type through a PhysicsMaterial. |
| Debug HUD > Modern / Classic | HUD style of the open scenes. |
| Audio > Generate Placeholder Sounds | Placeholder clips and the two default sound profiles. |
| Audio > FMOD Integration > Enable / Disable | Adds or removes the AVD_FMOD define. |
| Effects > Rebuild Particle Prefabs | Regenerates the default smoke, fire and exhaust prefabs. |
| Update Input Asset (Camera Map) | Adds the camera actions to an older bindings asset. |
| Samples > Build Playground Scene / Rebuild Sample Car Prefabs | Regenerates the sample (requires ProBuilder). |
| Documentation | Opens this manual as a PDF (the Markdown version if the PDF is missing). |
Assets are created with Assets > Create > Arcade Vehicle Driver (Vehicle Definition, Sound Profile, Effects Profile, Surface Effects, Impact Material, Camera Profile).
22. Inspectors
Every component and asset of the package shows what it is for at the top, then its settings in collapsible sections. The ? on a section explains it; Field descriptions (top right) writes each setting's explanation under it in every package inspector; otherwise hover a setting. Settings that only matter in a mode appear only in that mode. Open and closed sections are remembered.
23. Performance and determinism
- The simulation is plain C# integer math on preallocated buffers, with no Unity physics bodies for the cars.
- AVD Physics World > Max Ticks Per Frame caps catch-up ticks after a frame hitch.
- Given the same start and the same controls every tick, a car always does the same thing on any machine (replays, ghosts, lockstep networking). Presentation (effects, audio, camera, visual damage) never feeds back into the simulation.
- Use Unity Fixed Update runs the ticks from FixedUpdate with identical results (useful with other physics code).
24. Troubleshooting
| Problem | Fix |
|---|---|
| The car falls through the world | The ground is not on the AVDGround layer (or the layer was renamed: check AVD Physics World > World queries). Use World > Mark Selection As Ground. |
| The car drives through walls | Walls must be on AVDScenery with a collider. Mesh colliders become their bounding box; use BoxColliders for rotated walls. |
| The car gets stuck on a ramp edge / climbs walls | Ground pieces must not have vertical faces; put an AVDScenery box under ramps and platforms. |
| Keyboard does nothing | Click the Game view after pressing Play. Check Active Input Handling includes the Input System. |
| Wheels spin around the wrong point | Use Centre Wheel Pivots (vehicle inspector, Wheels). |
| The car floats or sinks | Run Fit Physics To Model, or adjust the wheel contact points and Wheel Size; check the model faces +Z. |
| No dents | Add AVD Vehicle Damage; the model meshes must be readable (the inspector offers to fix it). |
| No sound | Add AVD Vehicle Audio and assign a profile (Generate Placeholder Sounds creates one). With Use Ignition, start the engine (I). |
| The sample scene is pink or broken | The project must use URP; the Playground needs ProBuilder installed. |
25. Folders and assemblies
| Folder | Assembly | Contents |
|---|---|---|
Runtime/Simulation | ArcadeVehicleDriver | Engine-independent simulation: fixed-point math, vehicle data, physics, collisions, world step. |
Runtime/World, Vehicle, Input, Camera, Effects, Damage, Audio, Debug, Common | ArcadeVehicleDriver | Unity side: physics world, vehicles, input, camera, effects, visual damage, audio, HUD. |
Runtime/Integrations/FMOD | ArcadeVehicleDriver.FMOD | FMOD output (compiled only with the AVD_FMOD define). |
Editor | ArcadeVehicleDriver.Editor | Menu, setup tools, wizard, inspectors, Scene view tools. |
Defaults | - | Default bindings, camera profile, effects, sounds, materials. |
Samples/Playground | ArcadeVehicleDriver.Samples.Editor (only with ProBuilder) | Test city scene, sample cars and their builders. |
Documentation | - | This manual, the settings reference and images. |
See CHANGELOG.md for the version history.
26. Content notes
- The sample car models (
Samples/Playground/Models) and the damage overlay texture (Defaults/Damage) were created with generative AI tools. The placeholder sounds are synthesised by the package (Generate Placeholder Sounds). Replace them with your own art and recordings for a shipping game. - The handling is based on the gameplay mechanics of Driver 2. No assets of that game are included.